UDL Case Study: Accessibility in a Robotics Course

Dr. Mohammad Azhar and his students at Borough of Manhattan Community College revised a robotics curriculum to make it more accessible. The robotics curriculum is used for outreach to high schools in order to increase the representation of students of color in computer science fields.
A unique aspect of this collaboration was the involvement of Dr. Azhar’s students in the process as they received feedback, made revisions to the lesson plans, and asked clarifying questions. Some of the lessons learned from this experience were shared during an AccessATE webinar on the POUR principles of accessible design on March 25, 2020.
In this seven-minute video, Dr. Azhar explains the goals of the curriculum and his experience working with CAST to revise the lesson plans in the robotics curriculum to make them reflect accessibility best practices.
Areas of Focus for Curriculum Revision
- Ensuring each lesson plan had a logical document structure with properly styled section headings for improved navigation and organization of the content;
- Making sure tables used to organize information (e.g., a list of the ports on the robot and their function) included proper column and/or row headers to facilitate navigation for screen reader users; and
- Providing descriptive alternative text for each image representing what learners would see on the screen of the robot as they completed the activities.
Navigation: Section Headings and Table of Contents
Properly styled section headings help learners in the following ways:
- They speed up navigation for users of assistive technology. Most screen readers support a keyboard shortcut that opens a list of the headings in a document or web page. The reader can then select a heading from this list to skip to a specific section of the document.
- For learners who do not have disabilities, descriptive section headings allow them to quickly skim the document to get an idea of how the information is organized.
- For longer documents, a table of contents can be generated from section headings. This improves the usability of the document for everyone.
Best Practices for Section Headings
- Section and subsection headings should be created with proper markup. This means that the author uses styles to create the section heading rather than only formatting options such as making the text bigger and bold.
- Headings and subheadings should be used sequentially (e.g. Heading 1, Heading 2, etc.). Typically, a web page or document should have only one Level 1 Heading (H1) for the page/document title, with a Level 2 Heading (H2) used for the major sections, a Level 3 Heading (H3) for the subsections, and so on. You can think of this as an outline structure.
Section Headings in the Robotics Curriculum
Lesson Plan 1 was used to demonstrate the best practices Dr. Azhar’s students could follow while updating the remaining lesson plans of the robotics curriculum.
In the original lesson plan, both the document title and the first section heading (“Vocabulary/Terms”) were marked up as a first-level heading (Heading 1). A best practice is to only have a single first-level heading and to use this heading level for the document title.
In the revised lesson plan, “Vocabulary Terms” is marked up as a second-level heading (Heading 2), since it is not the document title and is at the same level as the next section (“Introduction: What is a robot?”).
Once the heading structure was revised a table of contents was added to improve navigation. Learners can use this table of contents to skip to any section, which is especially helpful on a long document. Another benefit of including a table of contents is that it reveals how the information is organized and highlights key relationships, improving understanding for everyone.
Resources for Section Headings
- Providing Structure in Web Pages and Documents (University of Washington)
- Headings in Word (WebAIM)
- YouTube Video: Mark Up Headings in Microsoft Word (NC State)
Tables
Sighted readers can quickly scan a table to get additional information from the column and row headers that make the value in each table cell meaningful. Screen reader users can get similar contextual information as they listen to each table cell read aloud, but only if the table has headers for each column and row that can be read aloud along with each cell’s value.
Best Practices for Tables
- Tables should be reserved for presenting data rather than purely layout purposes.
- Tables should be kept as simple as possible. Complex layouts with merged or spanned columns and rows should be avoided whenever possible, as these can present challenges for assistive technology.
- Headers for columns and rows should be added through the table options provided in the authoring tool, rather than by just selecting the text at the beginning of each column or row and making it bold. To add a header row in Microsoft Word, select the table and then check the box next to “Header Row” in the Table Design tab of the Ribbon.
Tables in the Robotics Curriculum
The following table from the lesson plan follows a simple design with two columns that appear to have section headers because the text is bold. Unfortunately, at the time of writing, Google Docs does not allow the first row of a table to be marked up as a header row. If the document is exported into the Microsoft Word format, this can be done by selecting the table and choosing Table Design, Header Row.
| Port | Sensor/Motor |
|---|---|
| 1 | Touch sensor |
| 2 | Gyro sensor |
| 3 | Color sensor |
| 4 | Ultrasound sensor |
| A | Medium Motor |
| B and C | Large Motors |
Resources for Table Accessibility
- Create accessible tables in Word (Microsoft)
Image Description
While there have been advances in artificial intelligence that now allow some screen readers to automatically generate a description of an image, this technology is still in the early stages of development and has a way to go before it is reliable. In the meantime, it is incumbent on authors to provide a text description for each image so that learners who are blind can access information that is equivalent to that provided to sighted learners.
Image descriptions, known as alt text, are typically added in a way that makes them available only to screen reader users. However, other learners can benefit from the more explicit explanations provided in image descriptions. It is important to ensure that there is no redundancy, with the same image description being read aloud twice to someone using a screen reader.
Best Practices for Image Description
- Images that convey information include appropriate alternative text (a succinct description of the image's content).
- The alternative text should be concise (no more than 125-150 characters) and focus on the information the image conveys rather than its appearance.
- Alternative text should not start with the word “image of,” unless it is important for the reader to know that it is a specific type of image (e.g., a black and white photograph).
- Images that are purely decorative are marked up in such a way that they can be skipped by a screen reader. Not all authoring tools provide the option to indicate an image is decorative. For those that do not, using the word “decorative” for the alternative text is recommended.
- Images that are functional (included in a link) have alternative text that reflects the action that will take place when the link is selected.
- For more complex images that require extensive explanation, short alternative text is provided and a link underneath the image points to the longer description in an appendix at the end of the document. The DIAGRAM Center provides helpful guidelines for developing image descriptions for complex images.
Image Description in the Robotics Curriculum
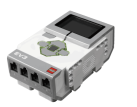
The table describing the parts of a Lego EV3 robot is an example of image descriptions that are provided as both alternative text available for screen reader users and text that appears in the document for everyone.
| Part of EV3 Lego Robot | Description of Part of EV3 Lego Robot |
|---|---|
 |
EV3 Brick The brick has output ports A, B, C, and D on one side and input ports 1, 2, 3, and 4 on the other. |
 |
Large Motor: |
 |
Medium Motor: (currently not in our kit) |
 |
Sensors: |
Each image has a brief description added as alternative text (right-click followed by choosing Alt Text and entering the text in the Description field in Google Docs). This short description essentially labels the image so that an association is made with the longer description made in the next cell of the table, which is available to everyone to read.
Not all image descriptions are as simple, and they often require some subject area expertise to draft them in a way that both ensures accessibility and supports the pedagogical goal for using the image. For this reason, it is recommended that image descriptions be considered as part of the editorial process and involve the authors, rather than be left to the discretion of an accessibility professional who may not have the necessary background knowledge.
Creating accurate and meaningful image descriptions is more of an art than a science. However, with practice, it is a skill that can be improved. We recommend taking a collaborative approach to the drafting of image descriptions, with each person on a team taking a pass at drafting their own descriptions before coming together to compare notes and arrive at a final description.
Resources for Image Description
- Alt text (WebAIM)
- Images Concepts (W3C)
- An alt Decision Tree (W3C)
- Image Description Guidelines (Diagram Center)
The way you add alternative text to an image will vary with the authoring tool:
- Add Alternative Text in Microsoft Office 365 (Microsoft)
- Add Alternative Text in Older Versions of Microsoft Office (Colorado State University)
- Add Alternative Text in Google Docs (Luis Perez)
Meet the Instructor
Dr. Mohammad Azhar is an Assistant Professor of Computer Information Systems at Borough of Manhattan Community College. Prof. Azhar has been involved in organizing and teaching numerous teacher training workshops for educational robotics programs, after-school robotics clubs, and robotics competitions for students for over a decade. He is passionate about getting undergraduate as well as K-12 students involved in solving robotics problems, taking part in robotics research, and competitions that help them realize where they could go with robotics in the real world. His dream is to get students involved in robotics and cybersecurity so they can excel in problem-solving and someday join teams that are designing next-generation robots and securing the digital world to make our lives better.
Disclaimer
 AccessATE is funded by the National Science Foundation under DUE#1836721. Any opinions, findings, and conclusions or recommendations expressed in this material are those of the author(s) and do not necessarily reflect the views of the National Science Foundation.